


Varnishing an oil painting is a crucial step in preserving its beauty and longevity. It protects the delicate paint layers from dirt, dust, and environmental damage, while also unifying the surface sheen and enhancing the colors. This guide provides a comprehensive, step-by-step approach to varnishing oil paintings, covering everything from preparation to aftercare.
1. Why Varnish Oil Paintings? The Importance of Protection and Aesthetics
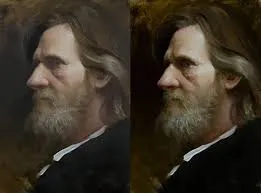
Before diving into the process, let's understand why varnishing is so important. One of the oldest liquid varnishes is dammar, which gives a very high gloss. An unvarnished oil painting is vulnerable. Over time, the surface can become dull, collect grime, and even be scratched. Environmental factors like UV light can also damage the paint film. A proper varnish creates a protective barrier, shielding the paint from these threats. It also saturates the colors, restoring the painting's original vibrancy and depth. Furthermore, varnishing provides a consistent gloss or matte finish, unifying the overall appearance of the artwork and enhancing its visual impact. It can bring out the subtle nuances of the painting, adding richness and clarity. If you prefer a higher gloss, a second equally thin coat of Gamvar Gloss may be applied after the first coat is tack-free. A gloss varnish can look nice, like the paint is still wet, really rich and shiny. To prevent this, it's best to use gloss for the first one or two coats to seal the painting and then only use matt for the second or last coat, which will be enough to knock back all the shine of the gloss varnish, and will reduce some of the matting agent in the layers.
2. Choosing the Best Varnish for Oil Paintings: A Deep Dive into Options
Permanent varnish, also called picture varnish, is just as it sounds: permanent. While varnishing creates a protective layer on a finished painting, glazing is a technique used to unify light and dark tones and create luminosity. Selecting the right varnish is crucial. The number of varnish coats required for an oil painting can vary depending on the varnish type and the desired level of protection and sheen. Several options exist, each with unique properties. Dammar varnish, a traditional choice, is known for its natural resin base and warm, slightly yellow tone. However, it can darken and crack over time. Synthetic varnishes, like acrylic or ketone varnishes (e.g., Gamvar), are often preferred today due to their durability, resistance to yellowing, and reversibility. Solvent-based varnishes are based on synthetic resins dissolved in petroleum solvents similar to white spirit. On an acrylic painting, this differs as the isolation coat adds a much-needed sheet of thin protection over the paint surface. If you apply an isolation coat to separate the painting from the varnish, that will give you an even gloss sheen, which while also protecting the paint surface during future varnish removal, also gives you an even sheen to begin varnishing. These are often preferred by conservators. Consider the desired finish (gloss, semi-gloss, or matte) and the specific needs of your painting when making your selection. Matte varnishes are formulated with matting agents (solids) in the varnish layer, which act to scatter the light at the surface of the painting. Some varnishes are designed for specific techniques or paint types. Research different brands and types to find the best varnish for oil paintings based on your project. Consider factors like ease of application, drying time, and long-term stability. Don't hesitate to consult with an art supply expert or a professional conservator for advice.
3. Preparing Your Painting: Cleaning Before Varnishing Oil Paintings is Essential
Varnish helps to even out the final painting at the very end to unify the layers and different colors of paint. You can choose from different types of varnishes, including spray varnish for easy application or a quick-drying gloss varnish that you can use two to three weeks after your painting is dry. There are several types of varnishes and finishes that work for various painting mediums. It protects a painting from environmental damage, like dust, dirt, or smoke. Before applying any varnish, the painting must be thoroughly cleaned. This step is essential for ensuring proper adhesion and preventing the varnish from sealing in any dirt or grime. Use a soft, lint-free cloth to gently clean oil painting surfaces. For more stubborn dirt, a mild solvent like odorless mineral spirits or a specialized art cleaning solution can be used cautiously. It's crucial to test any cleaning solution in an inconspicuous area first to ensure it doesn't affect the paint layer. If you are unsure of the cleaning process, or if the painting is particularly valuable or delicate, consult a professional conservator. They have the expertise to assess the painting's condition and recommend the appropriate cleaning method.
4. Remove Oil Paint Residue and Other Surface Imperfections (If Necessary)
If your painting has any residual oil paint on the surface, this must be removed before varnishing. Removable varnishes are recommended for ease of cleaning and conservation. This is particularly important if you've recently finished the piece and have excess paint from the painting process. Use a clean cloth dampened with a suitable solvent, such as mineral spirits or a specialized brush cleaner, and gently dab the affected area. They may be used to varnish both oil colour and acrylic paintings, but brushes must be cleaned with the white spirit after use. Be careful not to disturb the underlying paint layers. For more complex issues, such as stubborn drips or dried paint, removing oil paint can be difficult. Seek professional help. They may use specialized techniques and tools to safely remove the residue without damaging the artwork. For instance, a good soft brush is essential. Also, inspect the painting for other surface imperfections like dust, hairs, or dried drips. These should be carefully removed before varnishing.
5. Applying the Varnish: A Step-by-Step Guide for a Smooth Finish
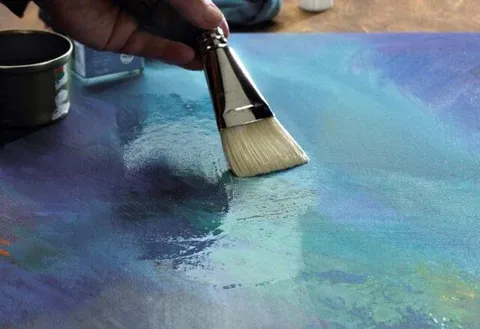
Retouching varnish is used to give some protection from scratches to the surface of a painting that isn't fully dry, during the waiting period before a final varnish can be applied. Retouching Varnish is a UV-resistant gloss varnish which gives temporary protection to recently completed oil paintings. Unvarnished paintings are vulnerable to aging in ways that varnished paintings are not. Also, retouch varnish is a solution greatly thinned with solvent and applied in thin films. It is also recommended to test the varnish on a small area before applying it to the entire painting. Once the painting is clean, dry, and free of imperfections, you're ready to apply the varnish. A good varnish brush is soft, flat, wide, and usually thin rather than thick. It's advised to wait at least 6 months, so the top layer of paint is completely dry, (microscopically) so that the varnish does not meld with the top layer, not becoming that desired separate layer. Work in a well-ventilated area, free from dust and drafts, and wear gloves to protect your hands. Lay the painting flat on a stable surface. Pour a small amount of varnish into a clean container. Acrylic water-based varnish is the best possible protection for paintings. Using a soft, wide, high-quality brush designed for varnishing, apply a thin, even coat to the painting's surface. Avoid drips, runs, and thick areas. Work in one direction, and then lightly go over the surface in the opposite direction to ensure even coverage. Allow the first coat to dry completely according to the manufacturer's instructions, usually 24-48 hours. A second thin coat can be applied for added protection and a more uniform finish. Some artists prefer to apply varnish with a soft cloth pad instead of a brush. An artist's choice of varnish often comes down to personal preference. This technique can help create a very smooth and even finish.
6. Drying and Curing: Patience is Key for a Durable Finish

You should apply most traditional varnishes six months after you finish a painting, and it is completely dry. After applying the varnish, allow the painting to dry and cure completely. When displaying varnished paintings, hang them on walls or surfaces away from bathrooms and kitchens, and avoid placing them above radiators or open fires, to avoid getting them dirty too quickly. This process can take several days or even weeks, depending on the type of varnish, the thickness of the application, and environmental conditions like temperature and humidity. Avoid touching the painting during this time. Keep it in a clean, dust-free environment, away from direct sunlight, extreme temperatures, and excessive humidity. Proper drying and curing are essential for the varnish to form a durable and protective layer. Adding an extra coat of varnish after the first layer dries will add another layer of protection to the painting. Rushing this step can lead to a soft, tacky varnish that is easily damaged. When using a spray varnish, if you work in several layers, you can judge the sheen and increase the gloss level the more coats you apply.
7. Clean Oil Paint Brushes and Oil-Based Paint Clean Up: Essential Aftercare
After varnishing, it's essential to clean oil paint brushes immediately. Use a suitable solvent, such as mineral spirits or turpentine, to remove any remaining varnish. Finishes for varnishes generally include a matte finish, satin finish, gloss finish, and high gloss finish. Follow the manufacturer's instructions for the specific type of brush cleaner. For oil-based paint cleanup in general, always use appropriate solvents and dispose of them responsibly according to local regulations. Proper brush cleaning will ensure your tools are ready for future projects and will prevent the varnish from drying and hardening in the brush hairs. Remember that proper oil-based paint cleanup is important for environmental safety. Never pour solvents down the drain.
8. Restore Oil Painting Considerations: When to Call a Professional
While this guide provides a general overview of varnishing oil paintings, certain situations require the expertise of a professional conservator. If your painting is very old, damaged, or has undergone previous restorations, it's best to consult a professional before attempting any cleaning or varnishing. They have the knowledge and skills to restore oil painting to its original beauty while preserving its historical integrity. Attempting to clean or varnish a valuable or fragile painting yourself could lead to further damage.
9. Varnishing Oil Paintings: A Skill Worth Mastering
Varnishing oil paintings is a skill that requires practice and patience. By following these steps and understanding the importance of each stage, you can protect and enhance your artwork for generations to come. Remember that every painting is unique, and it's essential to assess its condition and choose the appropriate materials and methods. With careful planning and execution, you can achieve a beautiful and lasting finish for your oil paintings. Sitting in a shipping warehouse will melt your uncured varnish, imprint the bubble wrap, paper, or plastic you used for wrapping, and ruin your life. Make sure to only apply one layer of varnish like this, or the result will be patchy.