


Oil paintings, whether cherished heirlooms or modern masterpieces, require delicate care to retain their vibrancy and value. As artisans crafting bespoke handmade oil paintings on canvas at Lenoir Decor, we possess a deep understanding of preserving these cherished artworks. This comprehensive guide provides art collectors and enthusiasts with the knowledge and techniques for cleaning oil paintings safely and effectively, following conservation practice recommended by institutions like the Smithsonian Museum Conservation Institute.
When studying famous oil painters like Claude Monet and their techniques, art enthusiasts often turn to oil painting books and oil painting videos to understand the oil painting process. However, maintaining these artistic mediums requires specialized knowledge beyond what typical household cleaning products can provide.
Table of Content
1. Assessing Your Oil Painting: A Conservator's Eye
-
1.3. Understanding Your Oil Painting Techniques: A Key to Safe Cleaning
-
1.4. Types of Soiling: Decoding the Dirt: Identifying the Culprit on Your Oil Painting
2. Creating a Safe Cleaning Environment for Your Artwork Conservation
3. The Art of Cleaning Oil Paintings: A Step-by-Step Guide
4. Post-Cleaning Care: Preserving Your Restored Masterpiece
5. When to Seek Professional Oil Painting Restoration
1. Assessing Your Oil Painting: A Conservator's Eye
Before embarking on the cleaning process, take a moment to understand the unique characteristics of your oil painting. A qualified painting conservator would always begin with thorough assessment and regular inspections, often referencing techniques documented in oil painting books and conservation practice manuals.
1.1. Document the Condition
Take clear photographs before you begin. This visual record helps track any changes during the cleaning process and serves as a valuable reference for future care. Here are some best tips to document effectively:
High-Resolution Images: Use a camera with good resolution to capture clear, detailed images. Multiple Angles: Take photographs of the entire painting, as well as close-ups of specific areas of interest, such as corners, edges, and any areas with visible damage. Varying Lighting: Experiment with different lighting conditions (natural light, artificial light) to capture the painting's surface texture and color palette accurately. Include a Scale: Place a ruler or another object of known size in some of the photos to provide a sense of scale. Secure Storage: Store the photographs in a safe place, such as a cloud storage service or a physical archive, to ensure they are readily accessible when needed.
1.2. Age and Origin
Is it an antique oil painting with delicate pigments and varnishes, or a contemporary piece painted on modern canvas panels with contemporary artistic mediums? Knowing its history helps determine the appropriate cleaning approach. Understanding the original painting medium used by the artist, whether they followed the thick over thin or fat over lean principles in their oil painting process, is crucial for proper art care.
1.3. Understanding Your Oil Painting Techniques: A Key to Safe Cleaning

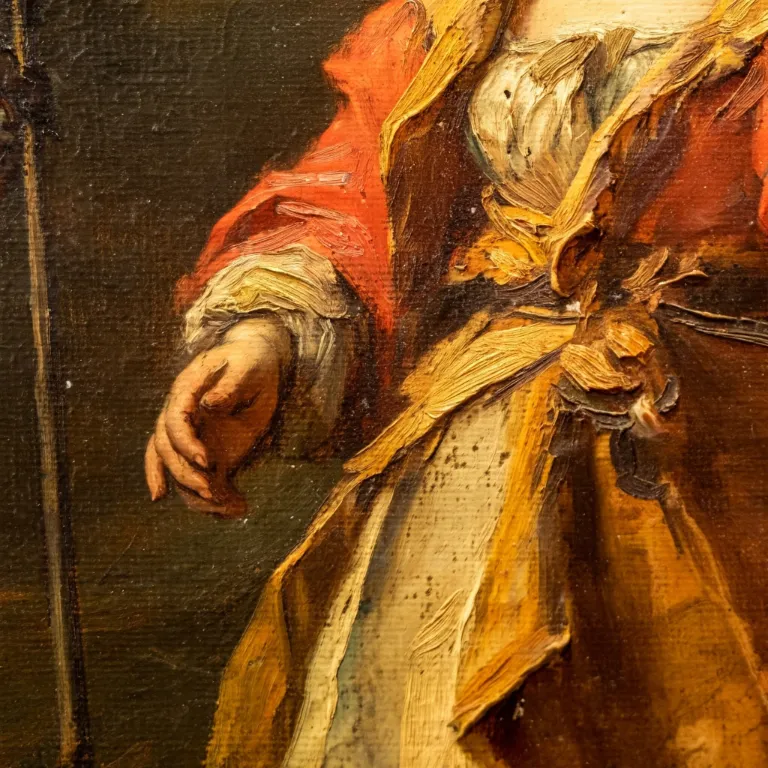
Before you begin cleaning, take a moment to appreciate the artist's oil painting techniques and how they impact your cleaning approach. Different painting styles, from Claude Monet's impressionistic brushwork to contemporary artists working on canvas panels, involve varying levels of texture and layering, which directly influence how you should clean the artwork.
Identifying the Artist's Style: Is it a smooth, Renaissance-style portrait with delicate glazes and carefully balanced color palette, or a vibrant Impressionist landscape like those of Claude Monet with visible brushstrokes? Is it a modern abstract with bold textures and mixed artistic mediums? Understanding the style helps you anticipate the surface characteristics and paint surfaces.
Impasto and Its Challenges: Impasto, a technique where paint is applied thickly (following the thick over thin principle), requires special care. These raised paint surfaces are more vulnerable to abrasion and catching on cleaning materials. Use a very gentle touch, avoiding any scrubbing motions that could dislodge the paint. Consider using cotton-tipped applicators rolled gently over the surface rather than wiping.
Smooth Surfaces: Paintings with smooth paint surfaces, like those using a glazing technique and fat over lean application methods, are generally less susceptible to damage during cleaning. However, they can still be sensitive to excessive moisture or harsh cleaning agents. Always use a dilute cleaning solution and dry the area thoroughly after cleaning.
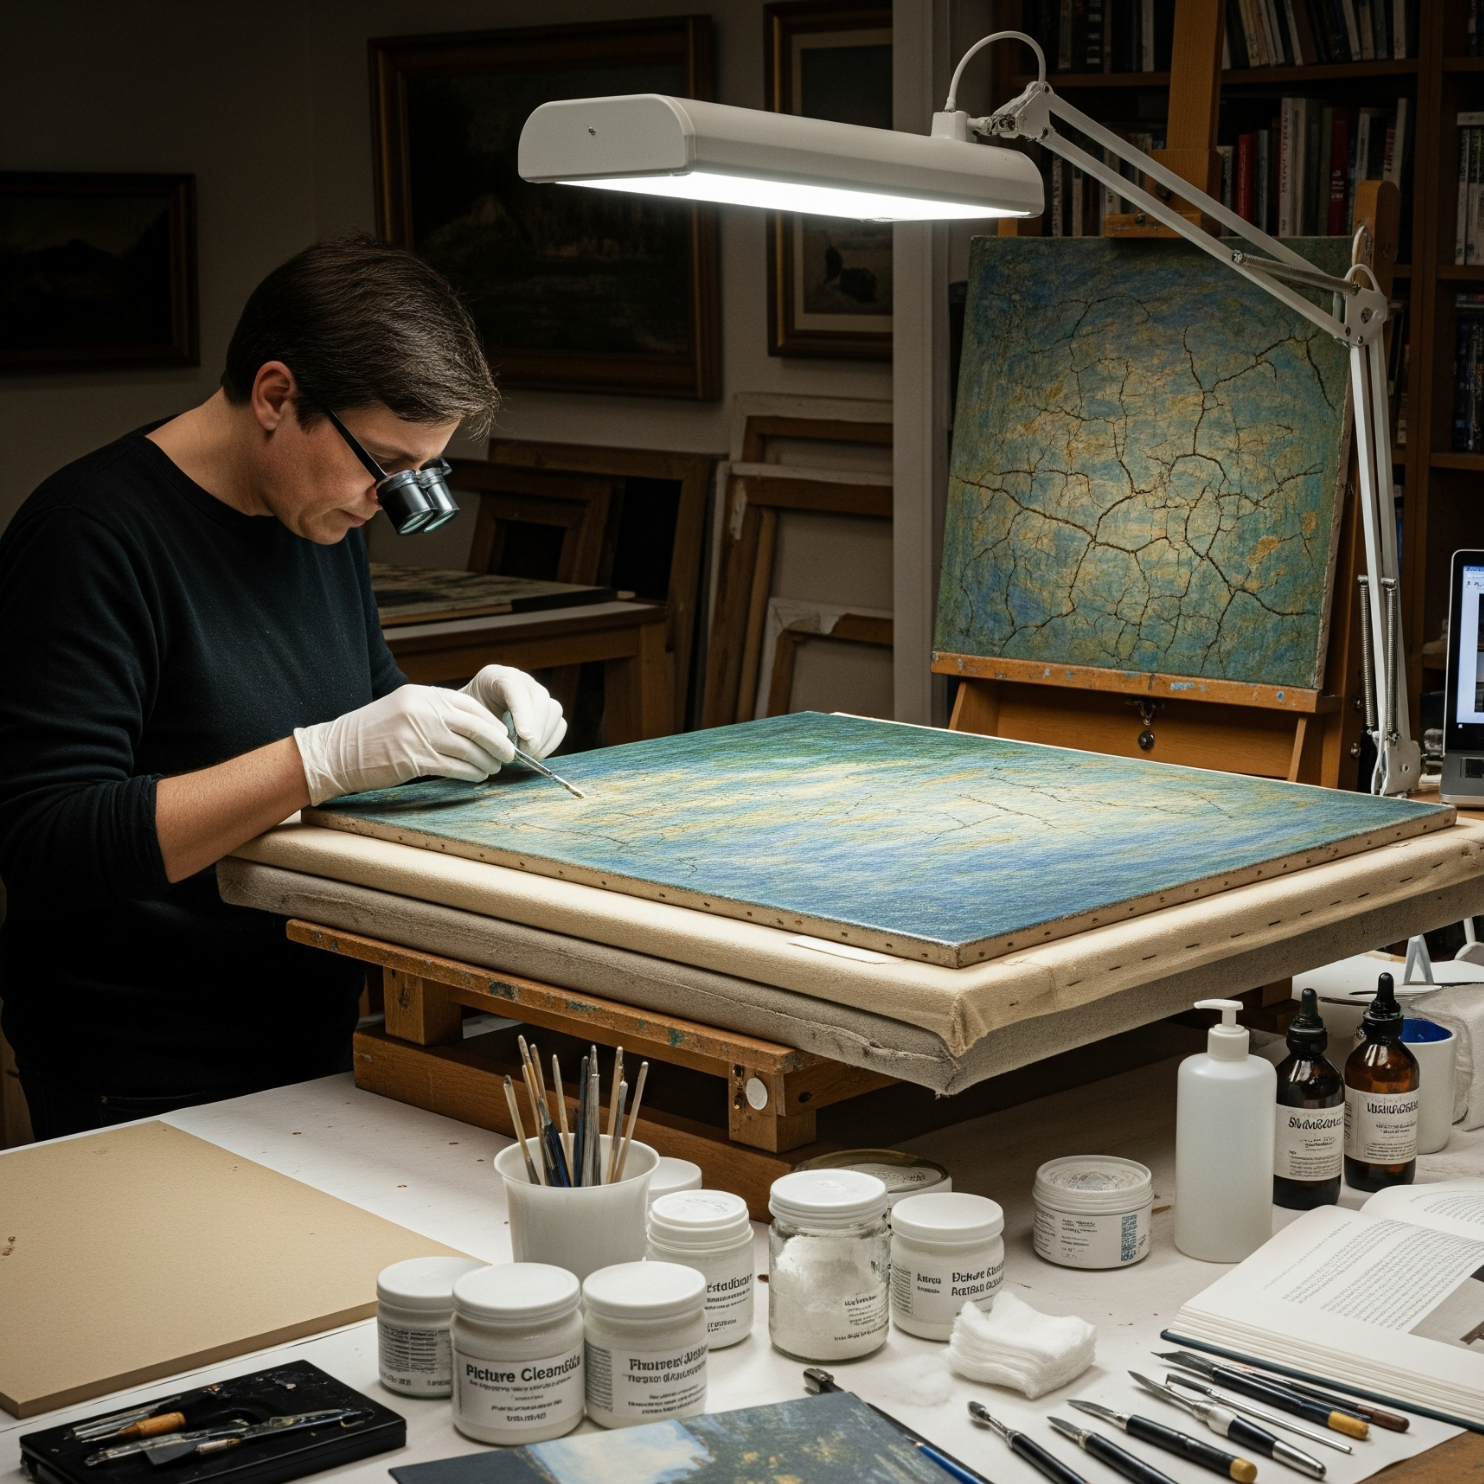
Delicate Areas and Craquelure: Pay close attention to areas with fine cracks, known as craquelure. These are common in older paintings and can be fragile oil paint films. Avoid applying pressure or excessive moisture to these areas, as it could cause further cracking or flaking. Instead of wiping, consider using a gentle dabbing motion with a slightly dampened cotton-tipped applicator.
1.4. Types of Soiling: Decoding the Dirt: Identifying the Culprit on Your Oil Painting
Understanding the nature of the soiling on your oil painting is crucial for selecting the appropriate cleaning method. Different types of dirt react differently to cleaning agents, and using household cleaning products or the wrong approach can cause irreversible damage to your artwork. Here's a closer look at common culprits:
Household Dust: This is the most common and usually the easiest to address through dry cleaning methods. It consists of fine particles like dust mites, fibers, and skin cells. A gentle dust removal process with a soft brush or microfiber cloth is often sufficient. While seemingly harmless, dust can accumulate and embed itself in the oil paint films over time, dulling the color palette and creating a hazy appearance.
Surface Grime from Environmental Pollutants: Airborne pollutants like soot, smoke, and cooking grease can settle on the painting's paint surfaces, forming a sticky film that attracts more dirt. This surface grime can be acidic and cause gradual deterioration of the varnish and paint. It often requires a mild cleaning solution to remove effectively, sometimes utilizing specialized products like Picture CleanGel for stubborn deposits.
Nicotine Stains: Tobacco smoke leaves a yellowish-brown residue that can be particularly stubborn and may require more than standard dry cleaning techniques. Nicotine stains not only discolor the varnish but can also penetrate the oil paint films, causing permanent damage to the color palette. Specialized cleaning solutions or techniques for removing cigarette smoke may be necessary.
Discolored Varnish: Over time, the varnish applied to protect the painting can oxidize and yellow, obscuring the colors and details beneath. A discolored varnish significantly impacts the painting's aesthetic appeal and original color palette. Removing it requires careful consideration and, in most cases, the expertise of a professional conservator trained in proper conservation practice.
Matching the Method to the Mess: Each type of soiling requires a specific cleaning method to ensure its safe removal without harming the paint surfaces.
- Dust: Gentle dry cleaning or dusting with microfiber cloth
- Surface grime: Mild soap and deionized water solutions, carefully applied and rinsed
- Nicotine: Specialized cleaning solutions like Picture CleanGel or techniques, potentially involving solvents or poultices
- Discolored Varnish: Professional varnish removal by a trained conservator using solvents and careful techniques
2. Creating a Safe Cleaning Environment for Your Artwork Conservation

Transform a well-lit room into a conservation-friendly workspace, ideally a climate-controlled room to ensure optimal conditions following established conservation practice.
Climate Control: Maintain a stable temperature (around 65-70°F) and moderate humidity (around 50%) to prevent damage to canvas panels or paint surfaces. Avoid direct sunlight and drafts.
Cleanliness is Paramount: Wear clean clothes to avoid transferring lint or fibers. Ensure your work surface is clean and dust-free. A HEPA-filtered vacuum can help minimize dust particles in the air during dry cleaning procedures.
Gather Your Artwork Conservation Tools:
Cotton: Use medical-grade cotton swabs and cotton-tipped applicators for their softness and absorbency. Cotton-tipped applicators are excellent for precision work. Avoid synthetic fibers that can scratch the paint surfaces.
Water: Deionized water is crucial to prevent mineral deposits that can affect the painting's appearance and color palette. Never use tap water, as minerals can leave residues on oil paint films.
Soap: Opt for a conservation-grade soap like Orvus WA Paste or olive oil-based soap, specifically formulated for cleaning delicate artwork. Avoid household cleaning products that can damage the paint surfaces.
Specialized Cleaners: For stubborn grime, consider products like Newton Artists' Picture Cleaner or Picture CleanGel for organic stains. Baby oil can sometimes be used for specific cleaning applications under professional guidance, though this should never replace proper conservation practice.
Solvents (use with extreme caution): For stubborn grime or varnish removal, consider solvents like mineral spirits or petroleum benzine. However, only knowledgeable individuals with the appropriate ventilation and safety equipment should handle these, following strict conservation practice protocols.
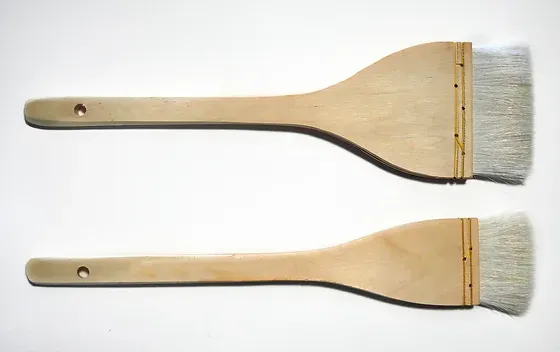
Tools: A magnifying lamp for close inspection, soft brushes (sable or hog bristle) for dry cleaning, a palette knife for removing stubborn dirt, and a small spray bottle for misting the surface.
Microfiber cloth: Essential for gentle dry cleaning and drying without leaving lint or scratches on paint surfaces.
3. The Art of Cleaning Oil Paintings: A Step-by-Step Guide
With your workspace prepared and tools at hand, proceed with the cleaning process. Remember that improper cleaning can cause irreversible damage to oil paint films and the original color palette, so always proceed with caution and follow established conservation practice.
Surface Dust Removal:
Begin with dry cleaning techniques. Gently remove loose dust with a soft, dry brush (like a hake brush) using long, gentle strokes in one direction. For delicate paint surfaces, consider a feather duster or carefully directed compressed air. A microfiber cloth can also be effective for dry cleaning on stable canvas panels.
Initial Cleaning Test:
Always begin with the gentlest method. Test deionized water on cotton-tipped applicators in a hidden area of the painting. If this effectively removes the grime without affecting the color palette, proceed cautiously.
Soap Solution Cleaning:
- Prepare a very dilute solution of conservation-grade soap and deionized water for aqueous cleaning
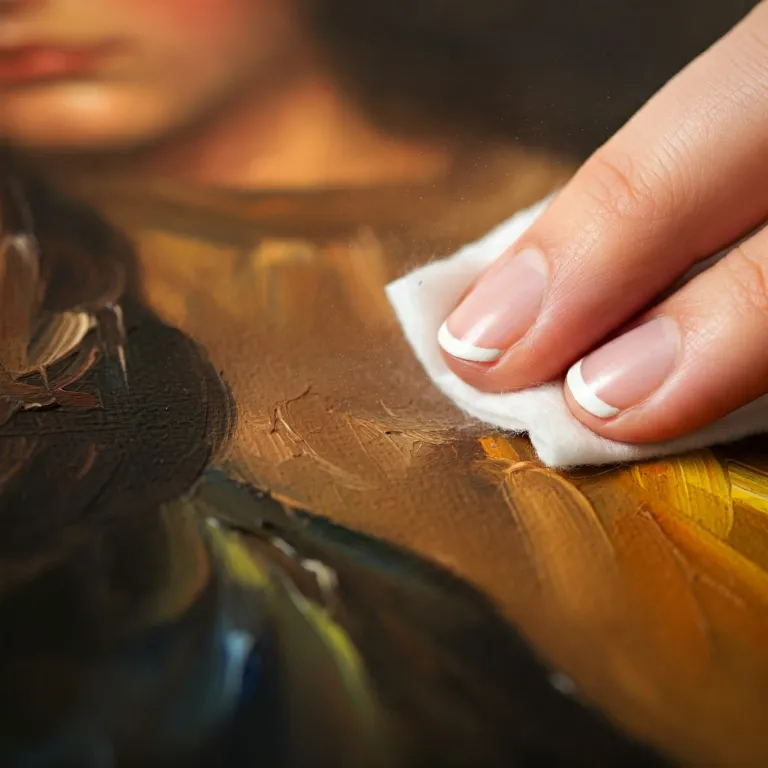
- Apply with cotton-tipped applicators, rolling them gently over the paint surfaces. Avoid scrubbing, which can damage the oil paint films
- Frequently change cotton-tipped applicators to prevent re-depositing dirt
- Rinse each cleaned area thoroughly with deionized water on clean applicators
- Blot the area dry with a soft, lint-free microfiber cloth
Addressing Stubborn Grime:
Spit Cleaning: This traditional conservation practice utilizes saliva's natural enzymes to break down grime. Apply with cotton-tipped applicators and remove with a clean, damp applicator. Only use this method on areas with stable oil paint films.
Emulsion Cleaning: For more ingrained dirt, consider a specialized oil-in-water emulsion cleaner (like Picture CleanGel or Winsor and Newton Picture Cleaner). Apply sparingly and follow the manufacturer's instructions meticulously to preserve the original color palette.
Varnish Removal (Advanced): This is a highly specialized procedure best left to trained conservators following strict conservation practice. It involves using solvents to carefully remove discolored varnish layers without harming the underlying oil paint films. Professional conservators may use specialized products like copaiba balsam or Retouching Varnish during restoration.
Special Considerations:
- Avoid starchy foods or their residues near paintings during cleaning
- Never use household cleaning products directly on paintings without professional guidance
- Be aware that improper cleaning techniques can cause permanent damage to paint surfaces and alter the original color palette
- Always prioritize dry cleaning methods when possible
4. Post-Cleaning Care: Preserving Your Restored Masterpiece

After cleaning, proper care ensures your oil painting remains in pristine condition, maintaining the integrity of both canvas panels and oil paint films.
Drying Time: Allow the painting to dry completely in a dust-free environment. This can take several days or even weeks, depending on the cleaning method and the painting's condition.
Re-varnishing (If Necessary): A fresh coat of varnish can protect the oil paint films and enhance the color palette. Consult a conservator for advice on the appropriate varnish and application method following proper conservation practice.
Framing and Display: Use acid-free mats and backing boards to prevent future damage to canvas panels. Hang the painting away from direct sunlight, heat sources, and areas with high humidity to preserve the color palette.
Regular Maintenance: Implement a schedule of regular inspections to catch potential problems early. Use dry cleaning techniques with a microfiber cloth for routine dusting and maintain proper art care practices as outlined in professional oil painting books.
5. When to Seek Professional Oil Painting Restoration
While this guide provides valuable information for cleaning oil paintings at home, some situations require professional intervention. Experts like Thomas Hoppe and Max Doerner have contributed significantly to our understanding of proper conservation practice, often documented in comprehensive oil painting books and educational oil painting videos.
Significant Damage: Cracks, flaking oil paint films, tears in canvas panels, or severe varnish discoloration that affects the color palette necessitate the expertise of a professional conservator.
Valuable Paintings: If the painting holds significant monetary or sentimental value, especially works by famous oil painters like Claude Monet, entrust its care to a qualified painting conservator trained in proper conservation practice.
Uncertainty: If you're unsure about any aspect of the cleaning process, don't hesitate to seek professional advice. Remember that improper cleaning can cause irreversible damage to paint surfaces and permanently alter the artist's intended color palette.
Professional Resources: Institutions like the Smithsonian Museum Conservation Institute provide valuable resources and guidelines for proper painting conservation, often supplemented by specialized oil painting books and educational oil painting videos that demonstrate proper techniques.
Learning Resources: Many conservators recommend studying oil painting videos and oil painting books that document the work of famous oil painters like Claude Monet to better understand how different artistic mediums and techniques (such as thick over thin and fat over lean applications) affect the oil painting process and subsequent conservation needs.
At Lenoir Decor, we not only create exquisite handmade oil paintings using traditional artistic mediums on quality canvas panels, but also understand the importance of their long-term care. We encourage art collectors and lovers to treat their oil paintings with the respect and attention they deserve, following established conservation practice rather than relying on household cleaning products. By following these guidelines for cleaning oil paintings, incorporating proper dry cleaning techniques and using appropriate tools like cotton-tipped applicators and specialized products such as Picture CleanGel when necessary, you can help preserve these cherished works of art and their original color palette for generations to come.